West Cairn Hill & Byrehope
Time – 4 to 5 hours
Distance – 9 miles/14 km
A challenging walk on a couple of the more remote Pentland Hills, taking in the top of West Cairn Hill at 562m, and the spectacular rocky outcrop of Wolf Craigs. Much of the route is across pathless moor and hillside which can be boggy after wet weather, but is easily navigated by following the dykes and fences that mark most of the route
Route: Start/Finish – Baddinsgill
![]()
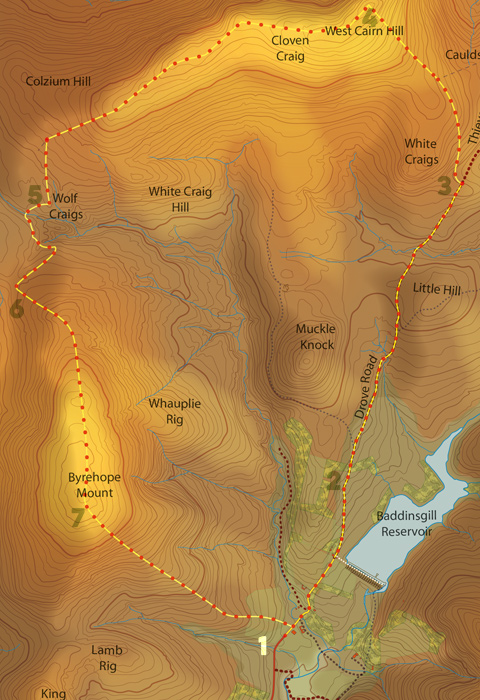
Leave the car in the parking area at the end of the West Linton to Baddinsgill public road[1]. Continue on the road down the dip and uphill again, past the houses until the reservoir comes into view to your right. Continue to the end of the tarmac, passing through a gate and onto a track, the Thieves’ Road, signposted ‘Little Vantage via Cauldstane Slap’. A few hundred metres further on, you pass through another gate[2]. Continue ahead, ignoring a turning to the left uphill. 2km later, cross a wooden footbridge and continue for 1km more, with the path becoming narrower, until you reach a waymarker post at a point where the main path continues forward and another path heads uphill to the left[3].
Take the path to the left and continue uphill until you reach a dyke, which you will follow steadily up West Cairn Hill to its summit trig point[4]. Bearing left from the trig point, continue alongside the wall (keeping it to your right) until it turns right and heads off downhill. At this point, keep going ahead, now alongside a fence that runs along the ridge of the hill. There is a fairly clear path to follow here which the new fence crosses a couple of times.
Keep following the fence all the way along the ridge past the rocks at Cloven Craig, staying with it as it descends SW, turning left down towards the low point between West Cairn Hill, Byrehope Mount and Craigengar. Here you will find the impressive sandstone crags of Wolf Craigs[5], through which the nascent Baddinsgill Burn flows.
Stay with the fence as it heads south and then turns left/NE uphill[6] to reach Byrehope Mount’s ridge. The fence then follows a straight line SE all the way up to the top, with a few false summits encountered on the gentle climb. At the summit[7], the fence swings left to head ESE down towards Baddinsgill, which is visible below you. The fence becomes a wall part way down, eventually reaching a plantation and junction with a fence. Cross the fence via a gate and head left alongside the plantation to a break in the trees. Descend through the break swinging left into the wooded Glen Ely, following the path back down to the public road just 50m from the parking area
(photo to come)